Easy & Stylish DIY Modern Farmhouse Wooden Bead Tray
If you’re looking for a decorative, trendy modern farmhouse wood bead tray, try this easy craft! Keep reading for simple instructions to make this DIY wood bead tray, for a fraction of the cost in the store!
DIY Rustic Wood Bead Tray Project: A Timeless Piece of Decor
This is one of those projects that I’ve had the materials sitting in my closet, for quite some time – and just finally got around to it.
I’m always looking for more ‘generic’ or ‘evergreen’ type crafts, things I can use with my seasonal decor rather than actual seasonal decor. I’ve seen similar trays and candle holders like this in Kirklands and Hobby Lobby. I knew with a little imagination, I could put one together myself.
This is a pretty easy project to make, though not quick. There is some drying time for the glue and the stain, but beyond that – yes, it’s pretty easy!
Materials for DIY Beaded Tray
This post contains affiliate links. See Disclosures for details.
Here’s a list of things you’ll need:
Pack of 6 Large Plywood Circles (10″) (Hobby Lobby)

Pack of Wooden Doll Pin Stands (Hobby Lobby)

Wood Beads (I got a string of them at Dollar Tree, but I have these wood beads, and they would have worked equally as well.)
E-6000 Glue (not hot glue)
Gel Stain or Paint (I used Dark Walnut Gel Stain)
Paint Brush
Rags
Instructions for Wooden Bead Tray
Here’s a detailed list of instructions. At the end, you can find a more succinct printable version, if that’s easier for you.
1| Glue wood round together.
First, you want to take your wood rounds and glue them all together with E-6000 glue, back-to-back. If you happen to have a thicker wood round in a single piece, feel free to use it and skip this step entirely!
Clamp pieces together to hold the wood circle together and let it set for 24-48 hours.

The end result should be a thick round wooden circle.
2| Stain or paint wood round.
Once your round has set into a single piece, you can stain or paint. Personally, I like using gel stain. Brush on gel stain to wood round and wipe off/rub into the wood. Be sure to rub along with the grain and not against it.
I’d encourage you to practice this step first on a spare piece of wood, so you can see how heavily or lightly you need to apply the stain to get the color of your liking.
If you are painting, use a brown color and paint as normal. You can also thin the paint out with a little water if you want some of the wood grain to show through.
Let dry.
3| Stain wood bases.
For this step, I lightly applied the gel stain to the base pieces (doll pin stands) with a brush and wiped off the excess with a rag. I didn’t put a ton of effort into this step because it mostly be hidden.
Let dry.
4| Stain the wooden beads.
If you can do this step having your beads on a string, that may make placing them on the wood round easier in a later step. However, my string started falling apart, so I took the beads off the string to stain them and then later glued them to the wood round individually.
For this step, I just brushed some gel stain on the hand with a latex glove and then rubbed the beads in my hand. Again, for this step, I wasn’t super-picky because I wanted a bit of an imperfect, rustic look. I was OK with a little bit of stain showing through.

Once all of your beads are stained, let dry.
5| Glue bases pieces to the bottom of the round.
Flip your tray over and position the base pieces. Basically, you want them to be laid ‘north, south, east, west,’ so the tray will be balanced.
You want them all equidistant to the outer edge, but not touching the edge. Maybe an inch or so from the edge, with the flat side placed against the wood.

Glue down with E-6000 glue and let dry at least 30 minutes. Setting time is 24 hours.
6| Glue your beads around the circle.
I can really only give instructions if you’re gluing individual beads, because that’s how I did the project. But theoretically, it should work the same if you have a string of beads.
Place a dab of glue on the bottom of the bead and place it on the edge of the tray. Make sure the bead is placed in a way so that the two holes that are on the sides of the bead are facing the beads that will come next to it – almost like you had a string running through it.
Take the next bead and place a dab of glue on the bottom and on the hole area of one side. Place the bead down on the tray, immediately next to the 1st bead, with the glue on the side touching that first bead. Adjust position to ensure that the beads are straight.
Continue to do this until there are beads around the entire tray.

**If you get to the end of the circle and you can’t fit another bead in, you can slide your beads in closer to see if you can close the gap. Or, you can try to spread your beads a little further out and fit a smaller bead in the gap.
For my tray, I just had to move the beads near the last gap out a little and fit in a smaller bead. Then I had to go around the tray and just restraighten them all to make sure it was neat and clean.
This definitely is the hardest part, but you want to try to get your beads in a straight, clean circle as much as possible, using your hand as a guide.
Once it is positioned how you want it, let it dry.
*** This is why I use E-6000 and not a glue gun. You can manipulate and move the beads a little bit before it sets and dries.
7| Dry brush white paint to create a rustic look.
Place some white paint on a paper plate or scrap of cardboard, and dab your paint brush in it. Wipe your brush until there is barely any paint left on it.
Then, lightly stroke your tray with the paint brush, over the beads and along the grain of wood.
Repeat this step until you have the rustic look you desire.

***Alternate method: You can also spray the tray with sealer, dust some flour on it, and rub it in to get a distressed, rustic look. Likewise, you can sprinkle flour first, rub it in, and then lightly seal after.
I tried this, and while I liked the effect in general, it didn’t give enough of a distressed effect as a dry brush did. But you can also use this method along with dry brush or by itself. I think using both methods adds a different texture, where you can really rub it into some of the wood cracks and grains.
8| Seal.
Take a can of spray sealer and lightly spray the tray to give it a protective coat. Note: this tray is not safe to serve food on; it is for decorative purposes.
If you want to serve food on it, place a doily or napkin or tea towel on top to protect the food.
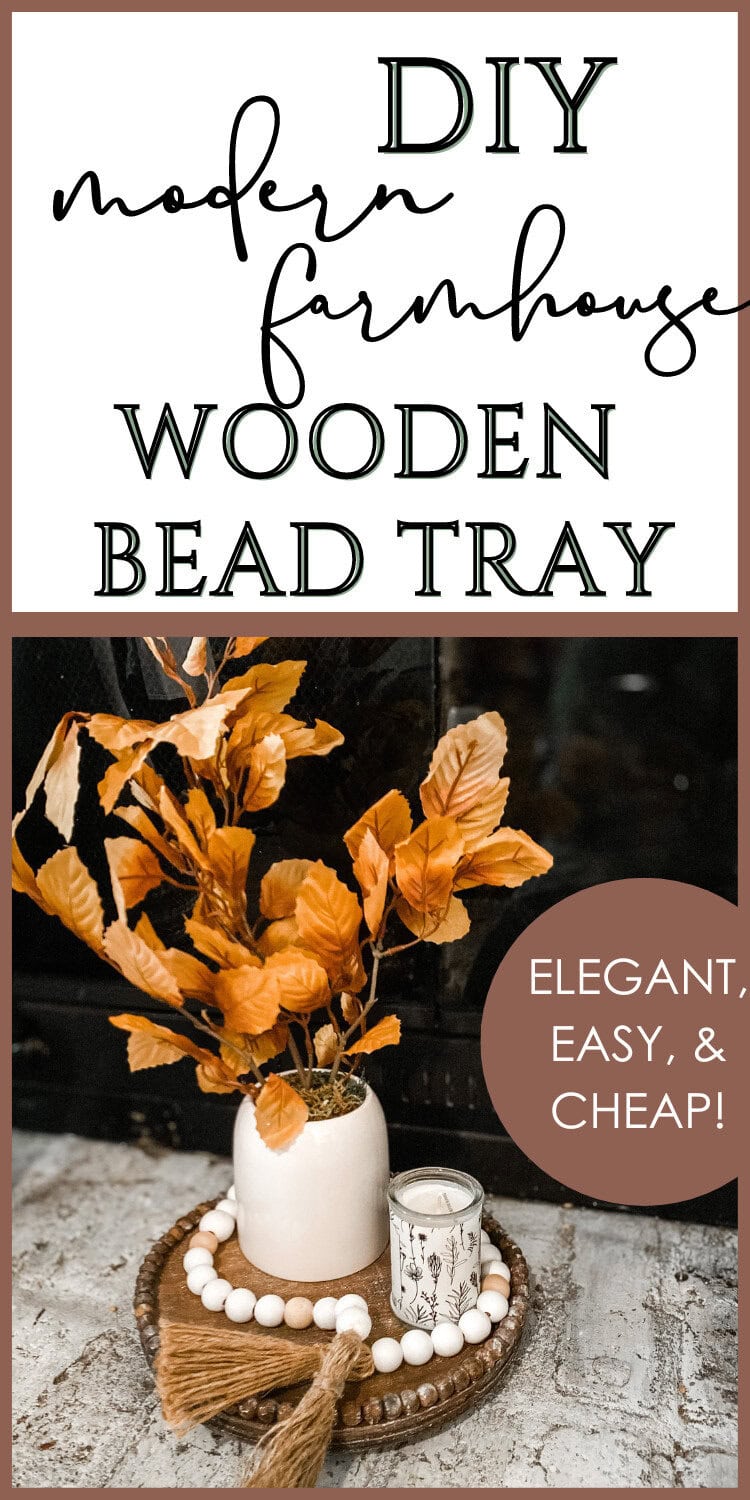
And there she is, all finished!


Below are some succinct, printable directions!

DIY Farmhouse Wooden Bead Tray
Materials
- 10" Plywood Circles, pack of six
- Pack of Wood Doll Pin Stands
- Clamps
- E-6000 Glue
- Gel Stain or Brown Craft Paint
- White Craft Paint, Matte
- Spray Sealer, Matte
- Paint Brush
- Rag
- Latex Gloves
Instructions
1| Glue wood round together
Take your wood rounds and glue them all together with E-6000 glue, back to back.
Clamp pieces together to hold the wood circle together and let it set for 24-48 hours.
The end result should be a thick round wooden circle.
2| Stain or paint wood round.
Brush on gel stain to wood round and wipe off/rub into the wood. Be sure to go with the grain of the wood and not against it!
{Practice this step first on a spare piece of wood, so you can see how heavily or lightly you need to apply the stain to get the color of your liking.}
Let dry.
3| Stain wood bases.
Lightly apply the gel stain to the base pieces with a brush and wiped off the excess with a rag.
Let dry.
4| Stain the wooden beads.
Brush some gel stain on the hand with a latex glove and then rub the beads in your hand to desired color.
Once all of your beads are stained, let dry.
5| Glue bases pieces to the bottom of the round.
Flip your tray over and position the base pieces in 'north, south, east, west' pattern so the tray will be balanced. You want them toward the outer edge, but not touching the edge.
Glue down with E-6000 glue and let dry.
6| Glue your beads around the circle.
Place a dab of glue on the bottom of the bead and place on the edge of the tray. Make sure the bead is placed in a way so the two holes are on the side of the bead, facing the beads that will come next to it.
Take the next bead and place a dab of glue on the bottom and on the hole area of one side. Place the bead down on the tray, immediately next to the 1st bead, with the glue on the side touching that first bead.
Adjust position to ensure that the beads are straight.
Continue to do this until there are beads around the entire tray.
**If you get to the end of the circle and you can't fit another bead in, you can slide your beads in closer to see if you can close the gap. Or, you can try to spread your beads a little further out and fit a smaller bead in the gap.
Once it is positioned how you want it, let it dry.
7| Dry brush white paint to create a rustic look.
Place some white paint on a paper plate and dab your paint brush in it. Wipe your brush until there is barely any paint left on it.
Then, lightly stroke your tray with the paint brush, over the beads and along the grain of wood.
Repeat this step until you have the rustic look you desire.
8| Seal.
Take a can of spray sealer and lightly spray the tray to give it a protective coat.
*Note: This tray is not safe to serve food on; it is for decorative purposes. If you want to serve food on it, place a doily, napkin, or tea towel on top to protect the food.
More Simple Rustic DIY Home Decor Projects
For more projects you can try, take a look below!
Easy Dollar Tree Farmhouse DIY Projects (done in 1 sitting!)
DIY Dollar Tree Rope Basket {Gift Basket Idea, Too!}
DIY Knock-Off Coffee Table Basket (for a Fraction of the Cost)
Easy Rustic Farmhouse DIY Dollar Tree Centerpiece – Any Season!
25 Budget-Friendly Farmhouse DIY Home Decor Projects (Updated!)
If you tried this, I’d love to see it! Please tag me in Instagram @100affections or leave a comment on Pinterest!
Other thoughts? I’d love to hear them – leave a comment below!
Be sure to save the pin for future reference!