Farmhouse Planked Wood Snowflake Sign (Pottery Barn Dupe for $2)
If you’re looking for a farmhouse winter decor DIY, this one is easy & CHEAP! You can get this planked wood snowflake sign at Pottery Barn for over $200 – or make it for $2. Come see how!
In Search of a Rustic Farmhouse Winter DIY
As I was getting ready to transition from Christmas to winter decor and was looking for some quick farmhouse winter DIYs, I was kind of surprised to find that there was not much out there!
There were lots of Christmas decor DIYs (and I have several in this Christmas DIY post that could have worked), and lots of winter decorating ideas (here are some of my most favorite cozy rustic farmhouse winter decorating ideas and tips) – but not a whole lot of winter DIYs.
So of course, if you know me, you know I’m not spending tons of money on decor for a season that’s really just a few weeks long.
I had quite a bit of decor from Christmas that was an easy transition to winter (you can see some of my past before-and-after pictures from Christmas-to-winter decor here) because I’m something of a lazy decorator. Efficient, I’d prefer to say.
However, there were just those few little areas that needed a little something.
Pottery Barn Wooden Snowflake Inspo
As I search Pinterest for some project ideas, I came across this Pottery Barn wood snowflake sign that I just loved.
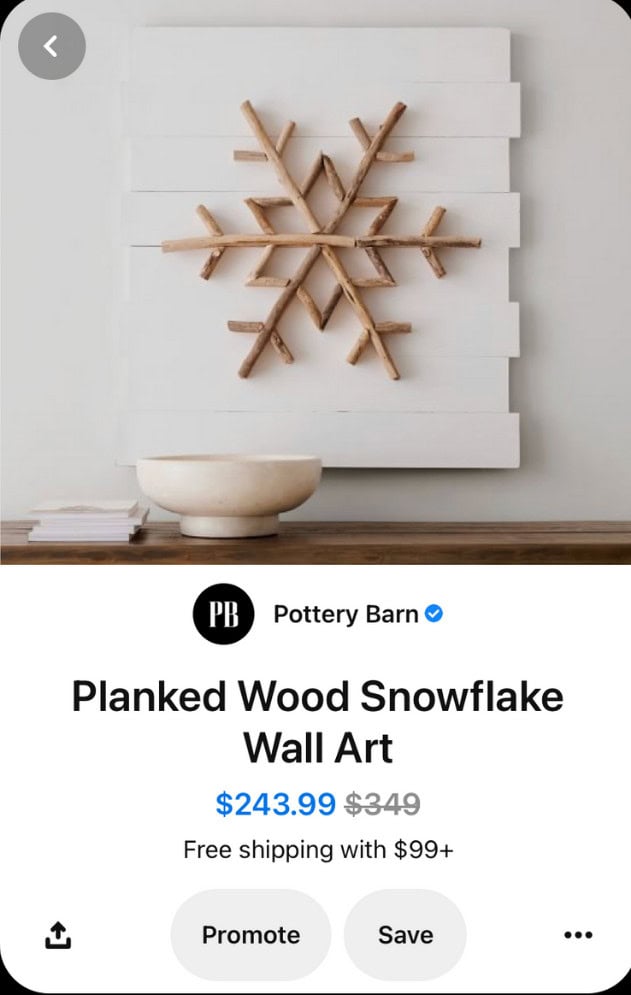
But that price tag? Are you even for real here?
Now granted, it’s a large sign they’re selling, but still.
Come. On.
I knew I could come up with something similar for about 1% of the cost. Granted, it would be on a smaller scale, but I did not need anything that big, anyway.
Best part? Three words: Dollar. Tree. Materials.
Yes, I made this for $2 + the glue and paint I already had on hand.
Material for Wooden Snowflake Sign
What You’ll Need
This project has a few nuances to it, but it really is so simple. For the materials, you just need a few things:
A fake shiplap seasonal sign from Dollar Tree (any season will do)
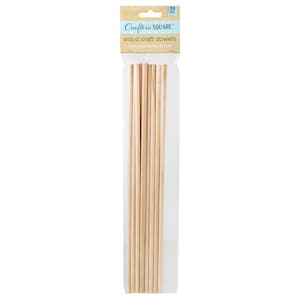
A pack of 12″ dowels from Dollar Tree
Glue and Glue Gun (Elmer’s Glue would probably work fine, too)
White craft paint and brush
Black craft paint (optional)
Pencil
Ruler
Pliers to cut dowels
Instructions for Wooden Snowflake Sign
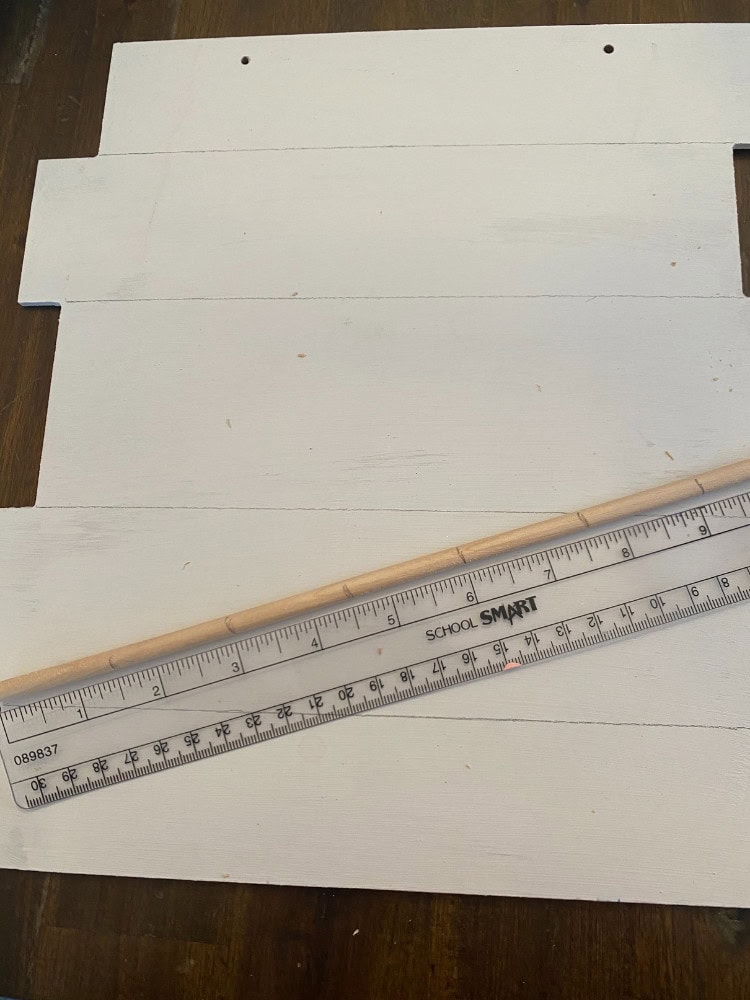
Preparing the Signboard
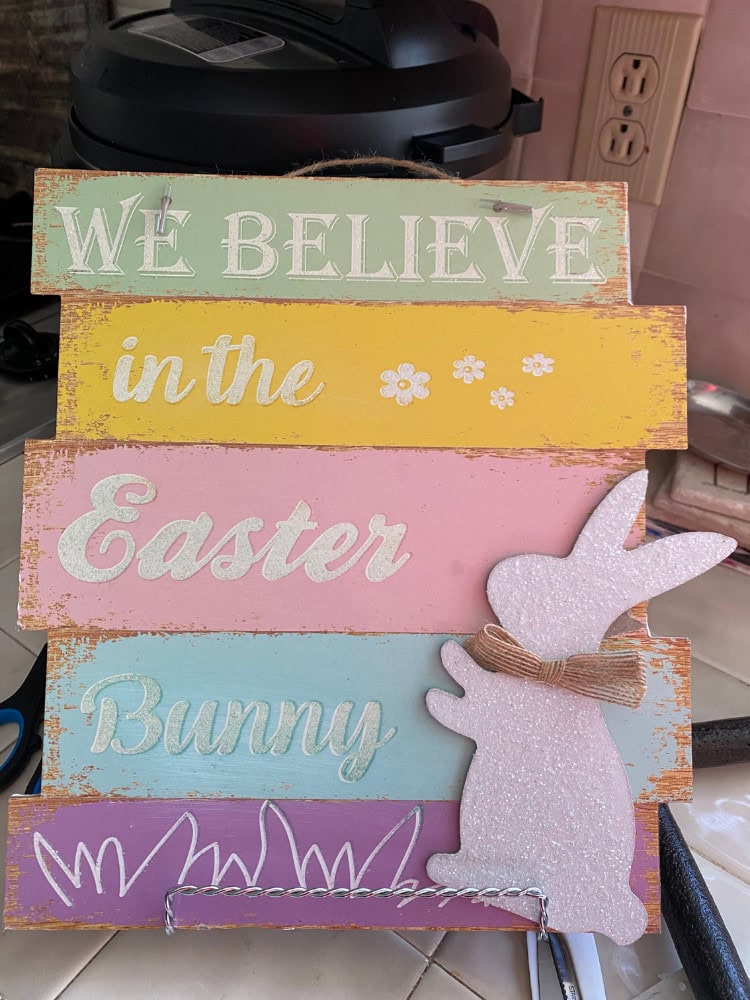
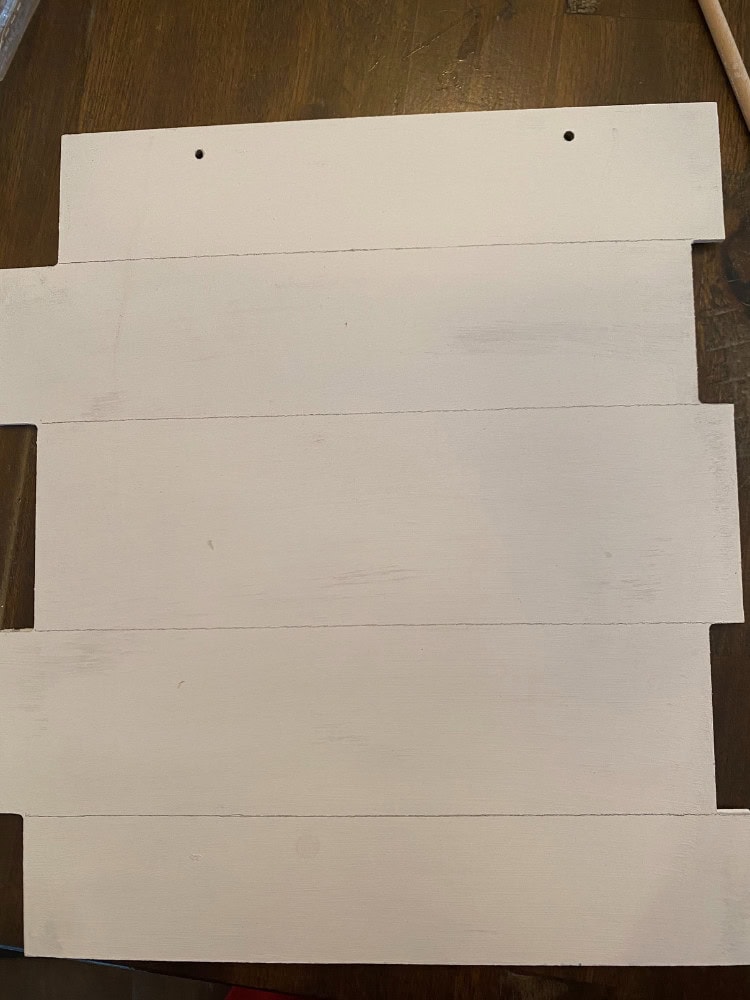
First, remove any extra decorations off of your Dollar Tree sign (mine was a bunny). Then, remove the string and paint the back of it white. You may need 2 coats.
Optional: If you want a more distressed look, you can take black paint, HEAVILY blot and use a dry brush technique to add some texture. (Take a look at Step 4 for quick instructions!)
Once it’s dry, use a ruler and pencil to draw the faux shiplap lines across.
Preparing the Snowflake
First, take 3 of your dowels and cut them down to 9″ inches. Then take 2 of those and cut them in half, so you have 4 4.5 ” pieces.
Then, you’ll need (12) 1″ dowel pieces and (12) 1.5″ dowel pieces. You can also do 24 1″ pieces if you prefer. That’s also fine.
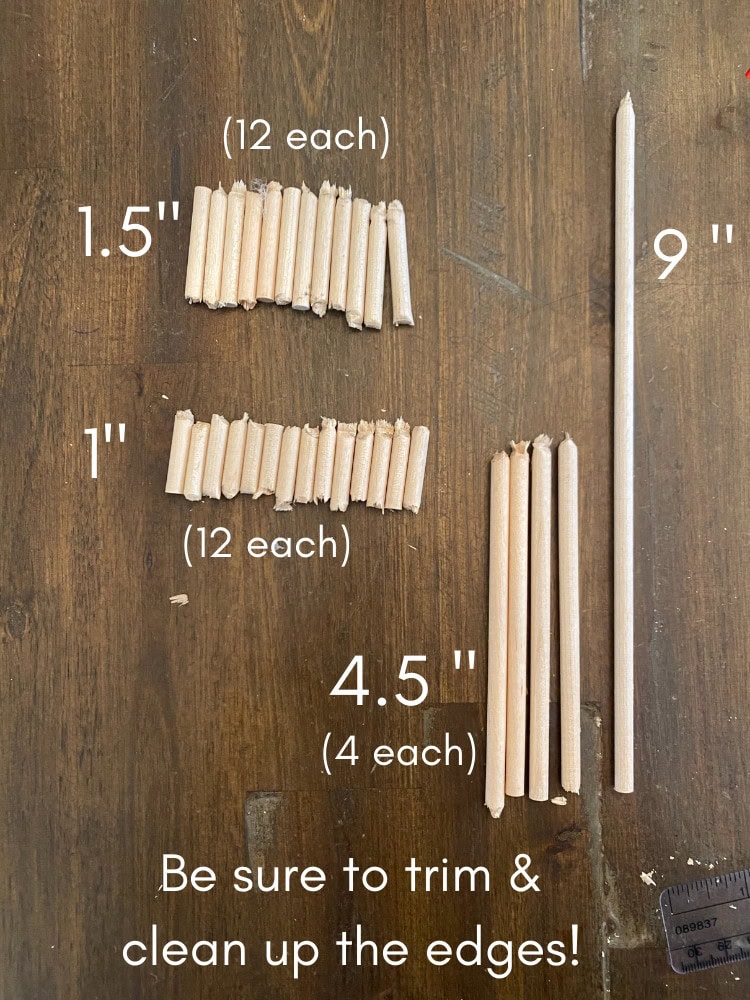
Use your ruler and pencil to mark the cut lines. Then, use something strong like pliers to cut the pieces at your markings. (I found that a rounded flat-top pair cut well).
You may need to use the pliers to score the dowels around the circumference of the cutting area before it will cut through. Sometimes, you can even just snap them once they are scored, and trim after.
Arranging & Gluing the Main Section & Center Area of the Snowflake
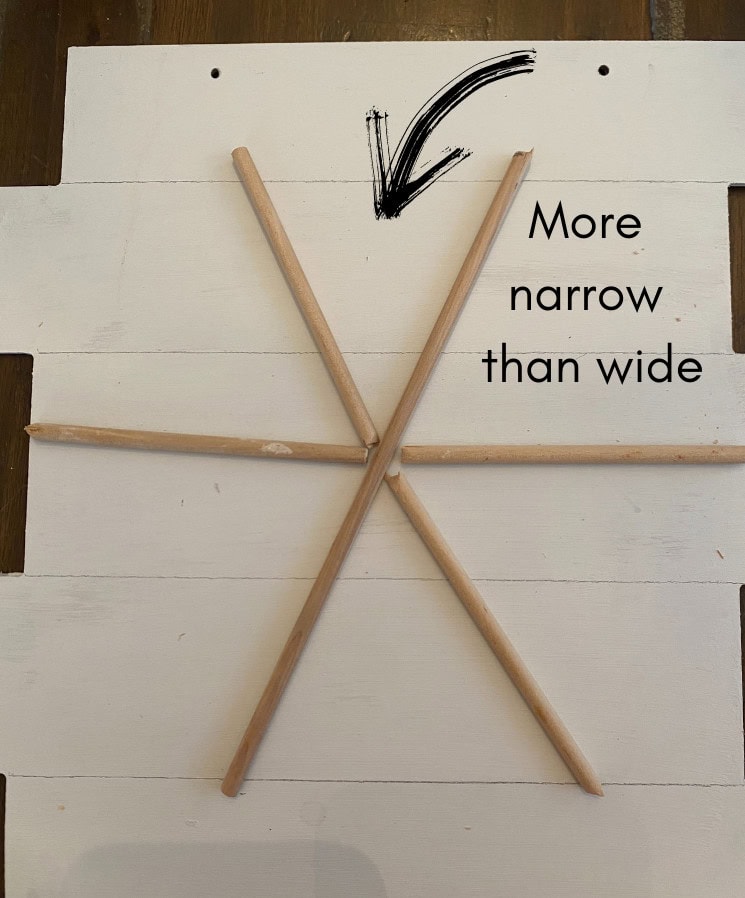
First, take your 9″ dowel and lay it horizontally across the sign. Do not glue anything yet.
Then, take your 4.5″ pieces and create an X that goes through the center piece. Make sure the angle of your X isn’t too wide at the top. It should be more narrow than wide.
Really, you can put the 9″ piece for any of those 3 lines. I switched it around later, but at first, I had it as a diagonal, as you can see below. Same difference.
Next, take your 1″ pieces and create the inside of your snowflake. The key to this looking right is to take the 2 pieces above the center line and 2 pieces below the center line and making sure they they are parallel. (See picture). This will ensure that the rest of those center pieces are at the correct angles.

Now, arrange all of the connecting pieces of the inside of the snowflake – 2 pieces touching diagonally in between each section of the large dowels.
You may need to trim or angle some edges of the 1″ pieces so they lay flat against the other pieces or lay how you’d like them to. They don’t necessarily have to be flat- just make sure you like how they look!
Once you have it arranged in a way that you like, THEN you can start to glue. You can either roll the pieces out of the way and put glue on the board.
Or you can pick up the pieces, put glue on them and place them back on the board. Whichever way you feel makes less of a disturbance on your arrangement!
Arranging & Gluing the Top Edge Portions of the Snowflake
After your small pieces have dried, take the 1.5″ pieces and make a V around each of the longer pieces (the 4.5″ pieces and the 9″ piece).
Make sure the ends of the 1.5″ dowels do not extend farther than the long pieces (unless you want it to!). It should make an imaginary arc between the 2 points of the V and the center piece.
In the original Pottery Barn picture, those smaller pieces are not even with the long center piece. You can do that too, if you prefer, especially if you went with 1″ pieces rather than 1.5″ pieces.
But because this is a smaller version of the original, there isn’t the same amount of room to bring those short pieces lower. It’s really your preference.
When that is set up how you’d like, glue those pieces down, using the same method as above!
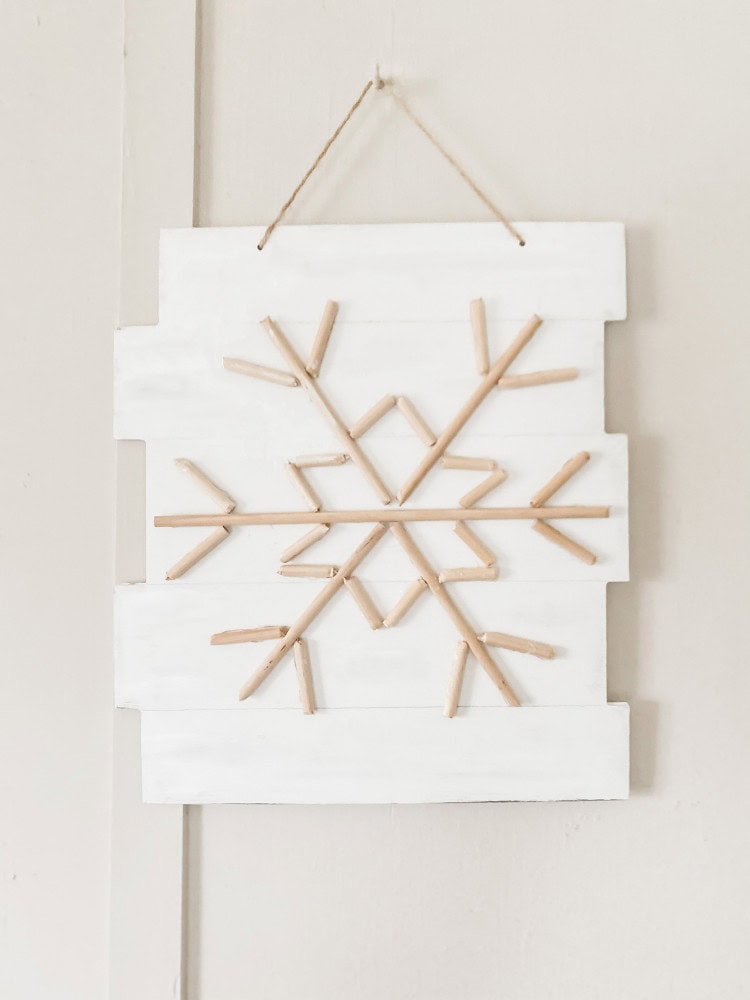
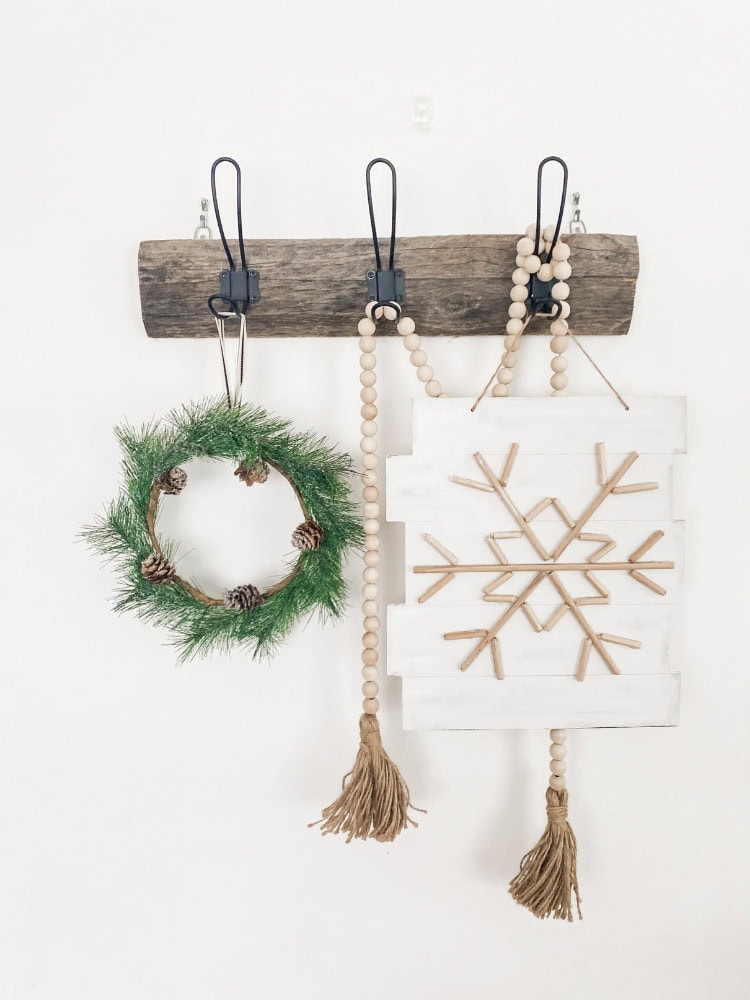
Re-insert the hanging string and go impress everyone you know!
Here’s how I styled it in my home! It was just what I needed for this space!
If you need the succinct version of instructions without the pictures, you can see it below!
Wood Snowflake Sign (Pottery Barn Dupe)
Materials
- 1 faux shiplap Dollar Tree seasonal sign
- 1 package of 12" dowels from Dollar Tree (10 to a package)
- White Craft Paint & Brush
- Black Craft Paint (optional)
- Glue (Glue stick/glue gun, Elmer's etc)
- Pencil
- Ruler
- Pliers for cutting
Instructions
- Remove string hanger and any add-on decorations from sign. Paint the back of the sign white. Using a dry brush technique, add distressing and weathering with black paint if desired.
- Using ruler and pencil, draw lines across for faux shiplap.
- Cut 3 dowels down to 9". Cut 2 of those in half, to 4.5" inches each (4 pieces in total).
- Using your ruler and pencil, mark and cut 12 one-inch (1") pieces and 12 one-and-a-half-inch (1.5") pieces. (You can also cut 24 1" pieces instead, if you prefer). Use the plier to cut. You can also score with pliers, snap pieces, then trim edges with pliers.
- Lay your 9" piece horizontally through the middle. Then, take your 4.5" pieces and create an X going through the center piece, with the top of the X a little more narrow than it is wide.
- Take your 1" pieces and create the inside of the snow flakes. Arrange 4 of those pieces (2 above the center line, 2 below the center line) so they are parallel with the center line. That will be your guide for arranging all of the center pieces.
- Add in the remaining 1" pieces to the center, creating a point with 2 pieces in between every large angle of the snowflake. Trim small pieces so they lay flat or look as you desire them.
- Glue down the large dowels and the small 1" center pieces of the snowflake.
- Take your 1.5" pieces and add them to the tops of the long pieces that make the main part of the snowflake. Arrange 2 pieces as a V around the longer dowel. Make sure they are arranged so that there is an imaginary arc between all 3 pieces. (Unless you want them uneven! That's fine, too!) The Pottery Barn original has them lower and not even with the long piece. If you've cut 1" pieces, that is definitely an option that could work!
- Glue 1.5" pieces down as desired.
- Reattach string and hang where you'll impress all your friends!
Here’s the side-by-side comparison!

If you create this project, I’d LOVE to see it! Please leave a comment on Pinterest or tag me on Instagram @100affections.com
More Winter DIY Projects
If you enjoyed this one, check these out!
40+ Cozy DIY Winter Decor Ideas
Easy DIY Crochet Jars (Use a Sweater if You Can’t Crochet!)
35 DIY Winter Wreaths (Easy Non-Christmas Ideas)
35 Cozy DIY Winter Decor Ideas (Farmhouse Style)
Genius No-Sew Hand Towel Wall Hanging (& Seasonal Craft!)
Thoughts? I’d love to hear them! Leave a comment below!


