Easy Dollar Tree Farmhouse DIY Projects (done in 1 sitting!)
If you are on a tight budget but love farmhouse decor, here’s help! Here are amazing home decor DIY projects and crafts using Dollar Tree supplies! And, they are so easy to make – easy enough to do in one sitting! Even while watching the kids! Keep reading to make your house beautiful without spending a ton!
Farmhouse DIY Projects = Playtime for Mom
As a SAHM, it’s easy to feel a little stir-crazy at times. I love being with my kids, but after one too many episodes of Paw Patrol or endless laps with Hot Wheels, I’ve craved something more creative.
When my twin boys were younger, they needed constant supervision, so even “free play” meant I had to be right there. But starting around age three, they began playing more independently, giving me little windows of free time.
At first, I used those moments to clean or organize, but soon I wanted something fun and productive. That’s when I discovered Easy Dollar Tree DIY Crafts.
These quick projects can be done in one sitting—even with painting, if you use fast-drying chalk paint. Best part? You can do them while keeping an eye on the kids.
They’re inexpensive (Dollar Tree or Walmart supplies) yet look surprisingly high-end. No, they’re not Pottery Barn, but they’re perfect for decorating beautifully on a budget.
Here are some of my favorite easy, affordable DIYs I’ve made around the house!
Easy Farmhouse Dollar Tree DIY Projects
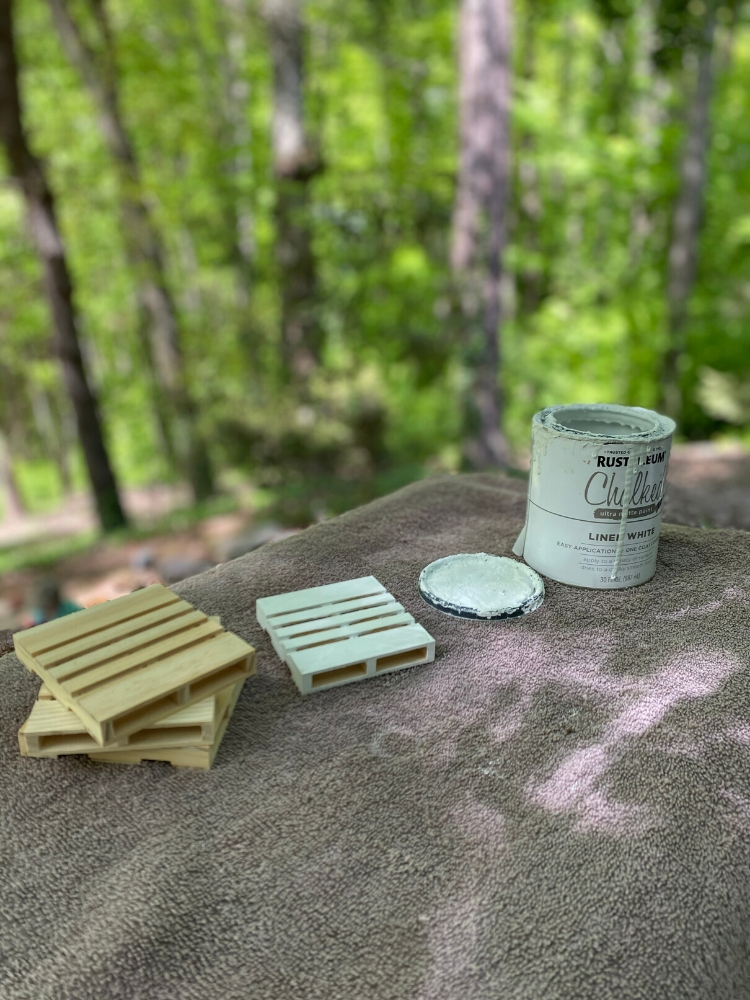
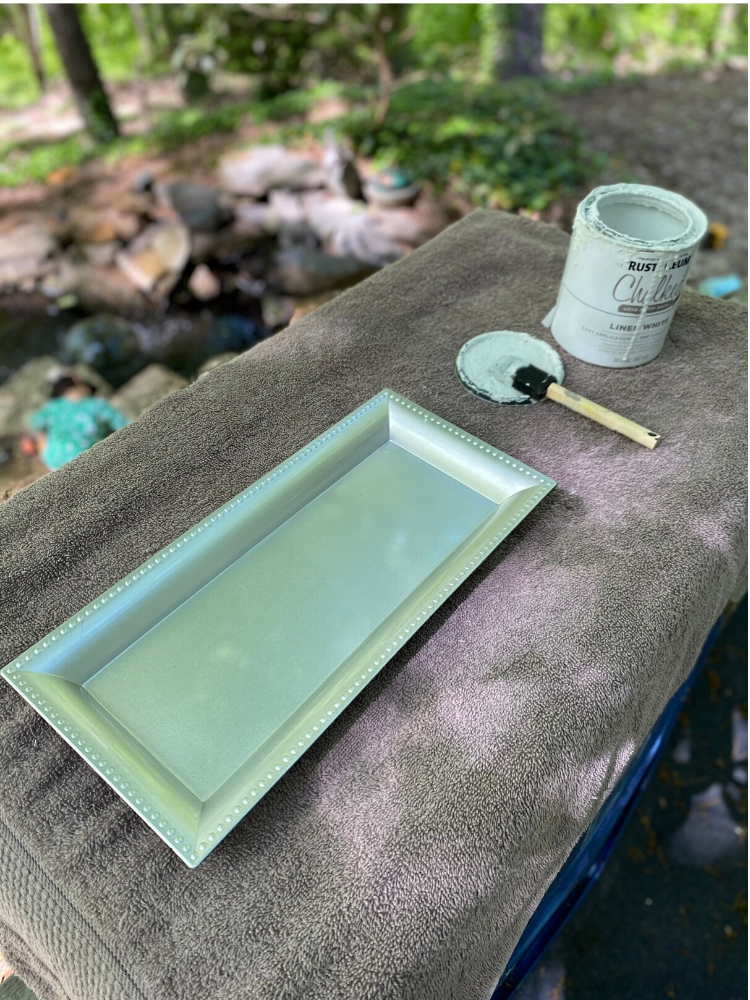
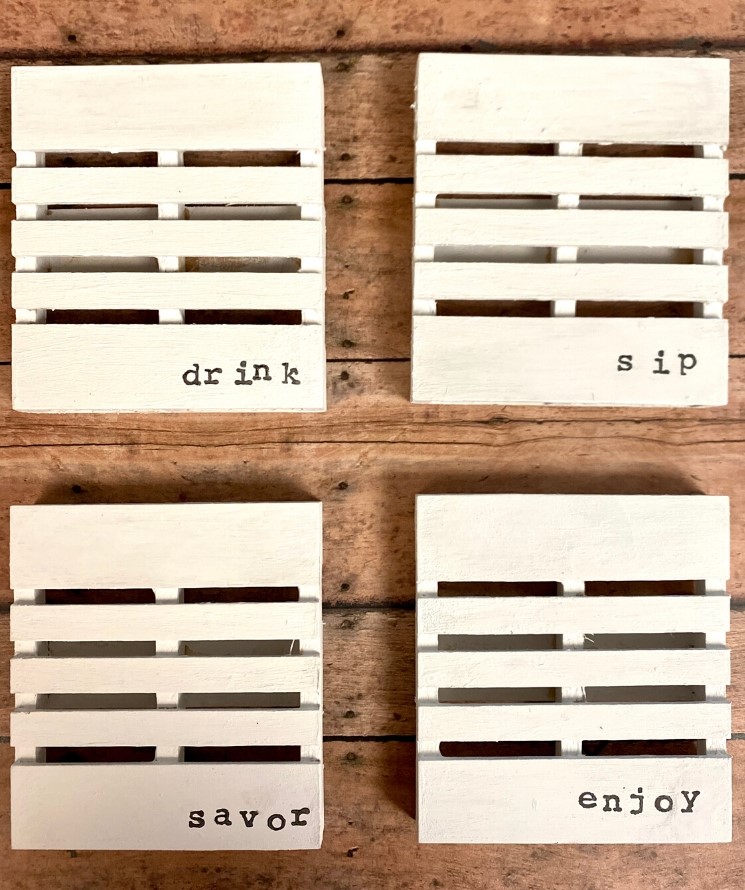
1| Coasters/Remote Tray
The coasters can be a little hard to find, but they are worth hunting down!
The trays always seem to be well-stocked!
This one just takes a little chalk paint and spray sealer! You can decorate them any way you like, but I happen to love using the stamp letters (as you’ll see on other crafts as well!)!
There’s a little second step to this craft, and that’s adding strips of cut rubber pot holders (1.5″ x 3.5″) to cover the gaps on the back. If you really want to protect the surface the coasters are on, you’ll want to do this.

You can also cut a square to cover the whole backside, but you’ll need a few more potholders, as you’ll need a 3.5″ square! I used E6000 glue and staples to hold them on.
The tray is multi-purpose, but it works really well as a remote control tray! You can put it in the kitchen, a coffee bar or in a bathroom or bedroom as well. You don’t need to keep the tray and coasters together, but I love them as a set!


Farmhouse House Coaster and Coffee Table Tray
Materials
- 4 Pallet Coasters
- 1 Plastic Tray
- Chalk Paint (White)
- Black Paint (optional)
- Sponge Paint Brushes
- Sponge Make-Up Applicator
- Rubber Square Potholder (as flat and with as few ridges as possible)
- E6000 Glue
- Stapler
- Letter Stamps and Ink (optional)
- Painter's Tape
- Clear Spray Sealer
Tools
Instructions
- Paint coasters and tray with white chalk paint. You may want to do 2-3 coats. For the coasters, you'll need to smush your sponge brush inside the pallet coasters if you want the inside painted. Let dry.
- If you want to distress it, use black paint and heavily blot a make-up applicator sponge, so the color is barely there, almost like a smokey gray. Using the sponge, gently touch the edges and rims of the tray and coaster. Gently brush any other areas you want to distress.
- Once dry, decorate as you like. I used stamped letters on mine. You can leave it blank, draw designs, stickers, and Mod Podge - totally your preference! Use painter's tape to get a straight edge if you're adding words.
- Cut rubber pot holder in 1.5" x 3.5" strips to cover the spaces on the backs of the coasters. Glue down with E6000 to hold in place. Reinforce with staples if needed.
- Spray surfaces with clear coat spray to protect paint and make water-resistant.
2| Rope Vase with Faux Greens
I’ve done this craft 2 ways – first, with jute string and rope cord (from Walmart).
 I’ve also done it with nautical rope and string from a $1 mop at Dollar Tree!
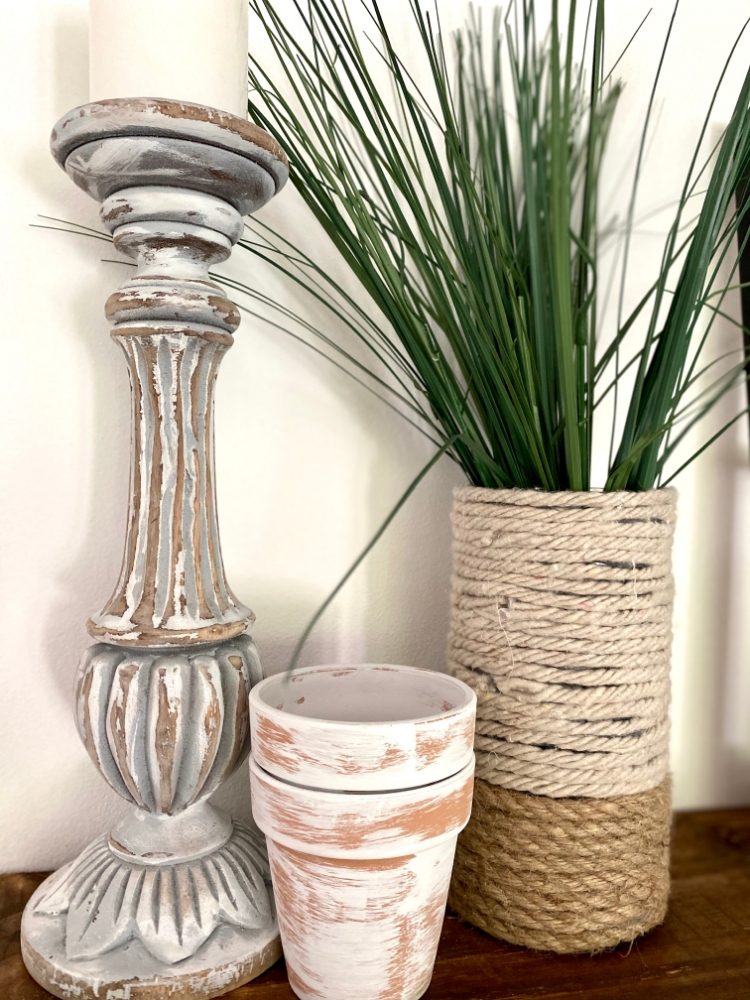
The effects are different, but to be honest, I love them both! The hurricane vases are from Dollar Tree as are the ropes and string.
The shinier string is actually from Walmart because Dollar Tree didn’t have the cord I usually use, but you can get a softer, white-ish rope from Dollar Tree, which I’ve used for other projects and like a lot!

The real trick to this is to lay the vase on its side and spin it as the rope winds around. Just use your finger to push it down and pull it tight as you go!


Modern Farmhouse Rope Vases
Materials
- 2 Glass Hurricane Vases
- Jute String
- White Rope Twine
- Glue Gun & Glue Sticks
Instructions
- Take jute string and put glue on the end of the string. Quickly stick to the bottom edge of the vase.
- Lay vase on its side and roll so jute string naturally winds around the vase. Use a finger to hold the string in place and make sure it is tightly wound and close to the layer under it.
- Periodically add glue to the string to keep in place. Make sure it's in line with the first one, so all the glue dots will be on the back of the vase.
- Wind jute string as high as you would like it to go. Cut the string so it finishes at the back of the vases and glue down the end.
- At the same spot, add the white string and secure it with glue.
- Wind white twine around vase using the same method as above.
- Once you reach the rim, cut the string so it finishes in the back of the vase. Secure with glue.
- Add greenery of your choice and display!
3| No-Sew Placemat Pillows
These are oh-so-easy and the possibilities are endless! As long as you have a placemat that is just 2 pieces of fabric sewn together (no stitching through the middle), you’re good to go! The bright paisley pillows were Dollar Tree placemats.

I also got striped placemat from Hobby Lobby for 50% off ($2.50 each), which I think is a pretty good price for a pillow!
 So, really, any place you find a placemat you love, you can make a pillow – you just need some stuffing ($2.99 for 12 oz at Hobby Lobby or $3.49 for 16 oz at Walmart), seam ripper, fabric glue and clips!
Here are a few I did for Christmas:

So, so easy!
I’ve also created pillows using a similar technique with an old blanket (and old sweater would work as well.).
Cut the blanket to the size of the pillow face that you want to cover, and just glue the edges with your glue gun! Super, easy! For the pillow you see below, I just sewed some jute string around the edges for a more rustic effect.
You can also make pillows out of kitchen towels (check out this post to see all the other amazing ways you can use hand towels as home decor!)

No-Sew Placemat Pillows
Materials
- 2 Placemats (make sure that the placemats are just 2 pieces of fabric sewn together at the edges - no stitching through the center area).
- Pillow Fill
- Seam Ripper
- Fabric Glue
- Clothespins or clips
- Scissors
Instructions
- Using a seam ripper, remove the top stitching at the edge of the pillow. Remove seam so the opening is large enough for your hand to fit through. Trim any loose strings.
- Fill the placemat with pillow stuffing to the fluffiness of your choice.
- Once finished, put fabric glue on both edges that were opened. Press together and place clips over the area as the glue dries.
- Wait 1-2 hours and then display your pillows!
4| Apothecary Jars
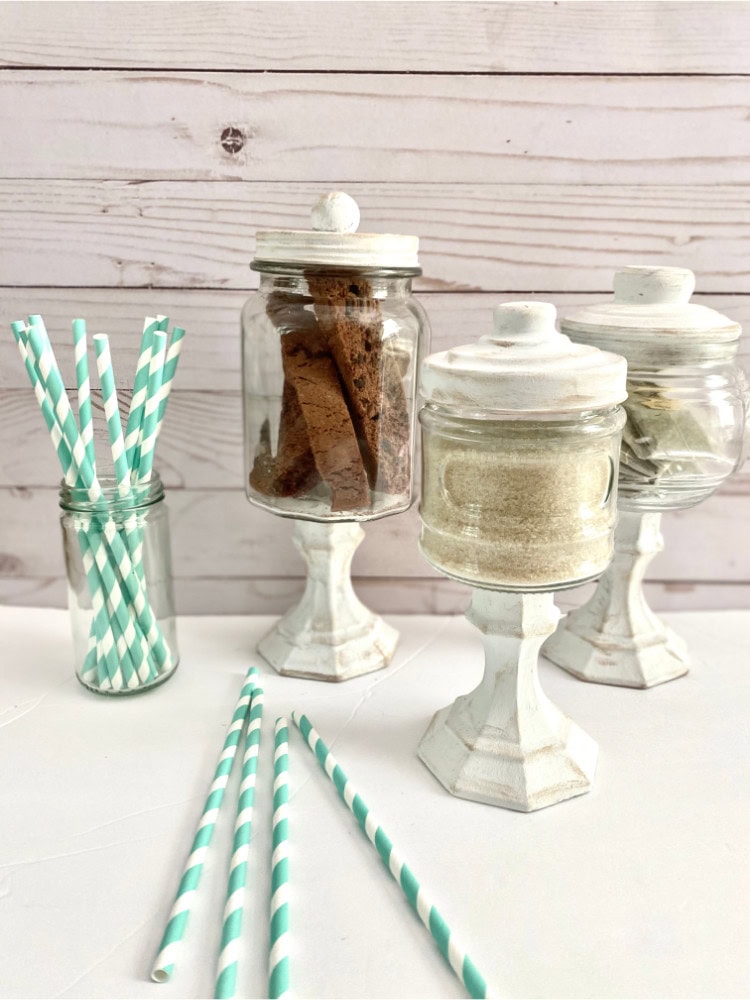
These are another one of my favorites! The jars are all from Dollar Tree, and I honestly need to stop myself from buying more jars. I just love them – and they actually can truly stand alone as decor if you didn’t want to make an apothecary jar. But for this craft, you just need jars, candlesticks, chalk paint, and E6000 glue!
There are lots of fun uses for apothecary jars. I have mine set up on my coffee bar, but you can put holiday decor in there each season, you can put them in the kitchen or the bathroom. They are amazing for a candy bar if you are having a bridal or baby shower.
You really can customize the style by the paint color you choose. I wanted a more rustic look, so I used white chalk paint and distressed with this Butter Pecan Beige chalk paint, which I use for EVERYTHING!
Apothecary Jars
Materials
- Jars with lids, various sizes, from Dollar Tree
- Candlesticks
- E6000 Glue
- Chalk Paint
- Black or Brown paint and sponge make-up applicator (optional)
- Small rubber ball (optional)
Instructions
- Paint jar lids and candlesticks with chalk paint.
- Once dry, place glue on top of candlestick and place jar on top of it so it's centered. Allow to dry.
- If there's no handle on top of the garm, you can paint a small rubber ball and glue it to the top as well.
- If you want to distress your jars, place paint on a paper plate or piece of cardboard. Dip makeup sponge in paint and blot HEAVILY before using. Paint should only be like a smoky smear. Lightly brush areas where you want to distress, especially focusing on raised surfaces and edges.
- Fill with all your favorite things!

This craft is so easy, and it’s really almost a little laughable – but it just adds a little style to something very functional. You certainly can use a plain clipboard for any of your purposes or buy one that with a saying on it, but I wanted a little farmhouse look. Chalk paint and Sharpie shiplap, and you have something a little stylish for an organizational tool.
The stand is also from Dollar Tree.
I use my clipboard as my Mom Command Center – for my weekly planner, menus for the week, recipes, cleaning schedule. It’s just something handy where I can keep my important papers for the week visible, easily accessible and neat.

{You can get the Spring Cleaning Schedule Printable over here at Coffee, Pancakes, and Dreams!}
I added the little saying at the bottom with stamp letters as opposed to decorating the main section of the board, since it would be covered most of the time. And ‘stay humble and kind’ is always a good reminder.
Just me?

Faux Shiplap Clipboard
Materials
- Dollar Tree Clipboard
- Chalkpaint
- Spone paint brush (plus a small detail brush)
- Ruler
- Painter's Tape
- Pencil
- Black Sharpie
- Easel (Dollar Tree)
- Clear Spray Seal (optional)
- Letter Stamps and Ink (optional)
Instructions
1| Put painter's tape over top clip to protect it.
2| Paint clipboard with a sponge brush and a small detail brush. Make clean, straight strokes horizontally across the board, to imitate a wood panel surface. Paint across front horizontally, and then top/bottom/side edges. Let dry.
3| You can do a 2nd coat if desired or if you want a more rustic look, you can use just one coat. (I only used 1 coat).
4| Determine the width you want for your faux shiplap lines. Measure out the lines, making 2 light pencil dots on the right and lefts sides, so you have a straight guide to connect on the lines.
5| Lay out your ruler to connect the dots and draws lines across with your Sharpie.
6| Add letter stamps with a saying of your choice or decorate with stickers, fabric, Mod Podge, or other designs of your choice (you can also use this tracing method for a more custom design!) Use painter's tape to give you a straight edge if doing any kind of lettering.
7| Seal with clear spray if desired!
8| Set on an easel and use it for all of your important notes and reminders!

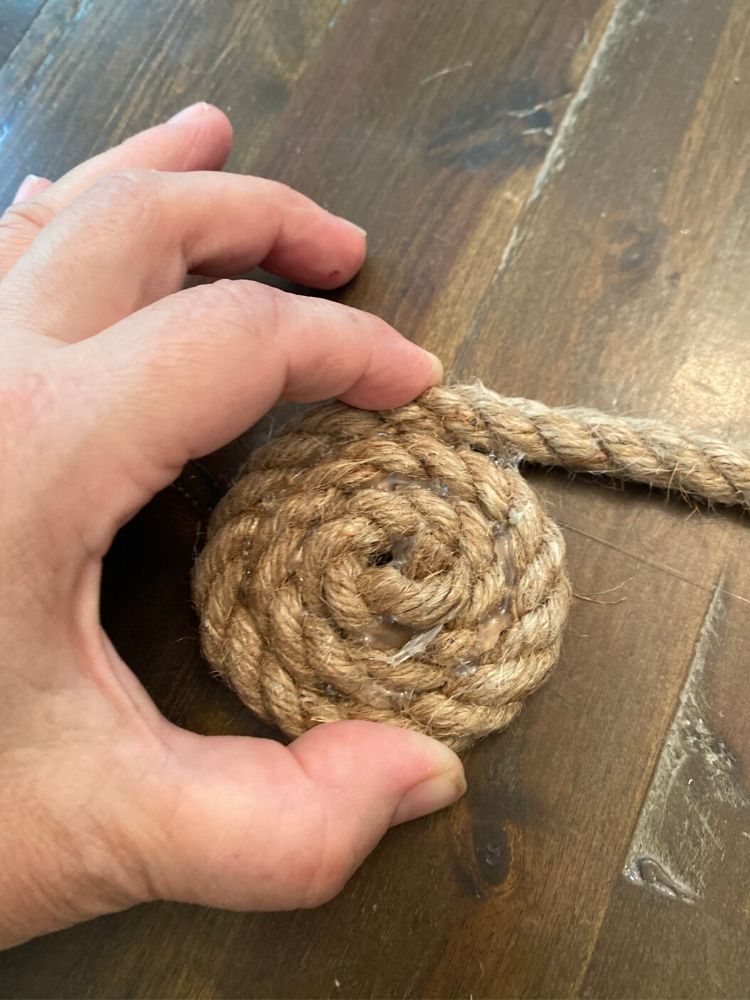
There are so many uses for this little project! Rope and a glue gun! That’s it!
If you buy the 9-foot nautical rope from Dollar Tree, 2 of them can make a large trivet or a small charger plate that you see above.
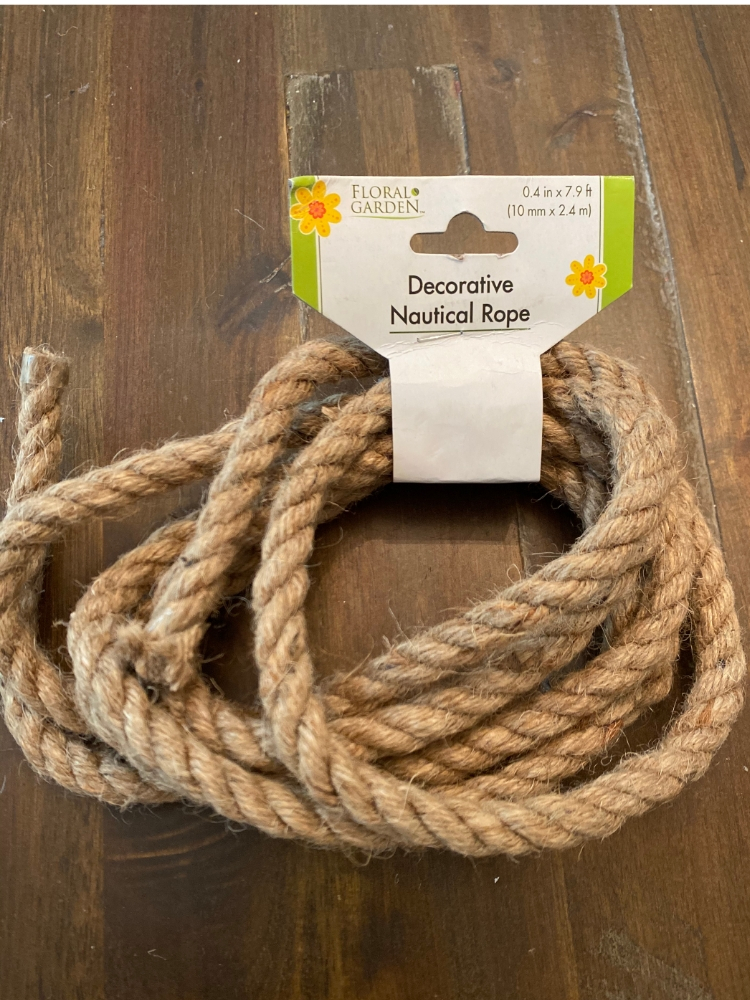
I also bought this long 100-foot sisal twisted rope from Walmart. It’s not as thick, but you can certainly make larger rope circles with more rope. A little more cost-effective.

The real trick to this is to make sure you tightly wind your rope circle as you glue – and get most of the glue on the sides and back. You don’t want the glue to show up too much on the front.
And, if you like boho decor, you can make these rope circles and hang them up! Cheap, easy, and creative decor! I love how mine looks hanging above my stove when they aren’t in use! I definitely see more of these in my future!

Rope Charger Plates and Trivets
Materials
- Jute Rope
- Glue Gun & Glue Sticks
- Scissors
- Wire Cutter (optional)
Tools
Instructions
1| Take edge of rope (nautical rope or sisal twist rope), bend, and twist so it creates the beginning of a circle.
2| Secure with a glue gun.
3| Wind your way around making a circle, gluing as you go. Be sure to pull rope tightly before you add glue so you have a secure, close area.
4| Do your best to keep any excess glue to the back of the trivet or plate.
5| Once you reached the end of the rope or your desired size, cut rope with scissors or wire cutters, on a long, gradual angle, so the last layer will blend in with the circle.
6| Glue edge to the circle.
7| If you'd like to hang them, cut a short piece of jute string, create a loop, and glue ends to the back.
Notes
** Nautical Rope from Dollar Tree comes in 9.5 foot lengths. This will give you enough for a small trivet. Using 2 of them can make a large trivet or a small charger plate. The one in the pictures uses 2 ropes (19 feet).
I recommend using a large spool of rope from Walmart so you can make the trivets and charger plates as large as you like.

This actually turned into one of my favorite projects. I LOVE how it turned out! These trays are $1 at Dollar Tree – 5.5″ x 7″, so they are somewhat mini! But for this project, it’s just chalk paint with an image I printed out on my home printer!
Cut your image down to size (about 4.5″ x 6.75″), and Mod-Podge it to the bottom. This works flawlessly if you are painting the tray white. You really can’t even tell that it a separate material.
You can totally customize it to your taste – boho, farmhouse, a fun saying…. or you can decorate it with a Cricut, stencil, or rub-on transfer! Totally up to you! But the Mod Podge way is just so easy!
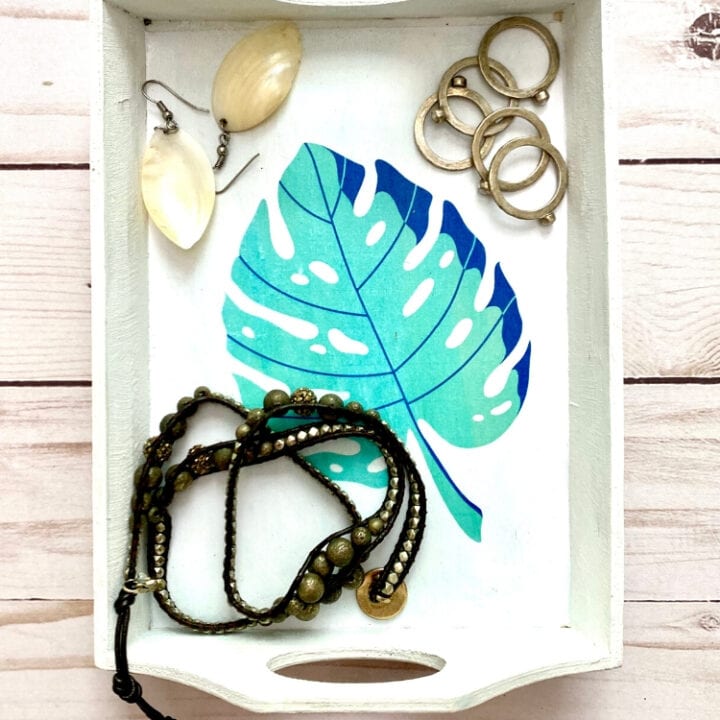
Trinket Tray
Materials
- Wooden Tray from Dollar Tree
- Printed out image from computer (your choice)
- Sponge paint brush
- Chalk paint
- Paper Cutter (or scissors)
- Mod Podge
Instructions
- Paint tray with chalk paint. Let dry.
- Find an image or saying you want to place in the bottom of the tray on the computer. Print out on the computer. (You can fill out the box above to get the graphic that I used!)
- Trim image with a paper cutter or scissors to fit the bottom of the tray, about 4.5" x 6.5".
- Using the sponge brush, put Mod Podge on the bottom of the tray.
- Place printout on the bottom and smooth wrinkles out with your finger or other smooth object.
- Add Mod Podge to the top of the image as well as all over the try to seal and give it a uniform look.
- Let dry and enjoy!
Notes
*The Mod Podge could cause a little bit of the color from the printout to smear a bit. Mine was very faint. You may want to do a test before your image is sealed to the bottom. For the areas where the colors were faintly bleeding into white, I just added a little bit of the white paint to blend it.

Easy Dollar Tree DIY for the Farmhouse Win
I hope you loved these projects as much as I did! I’m hoping to add more as I go along! There’s always a good Dollar Tree DIY to be done! And it’s truly amazing that you can get such beautiful farmhouse decor on that kind of budget! This has my heart!
More Farmhouse DIY Projects
25 Budget-Friendly Farmhouse Home Decor DIY Projects.
Simple and Pretty Modern Farmhouse DIY Wood Bead tray
25 Crafty Things to Do with Old Windows.
Love seasonal decor DIYs? Try DIYs for Fall, Christmas, Valentine’s Day (and Dollar Tree Valentine’s Day DIYs), and Spring!
2 Easy Ways to Make a Hat with HTV and a Mini Heat Press
Thoughts? I’d love to hear them! Leave a comment below!


2 Comments